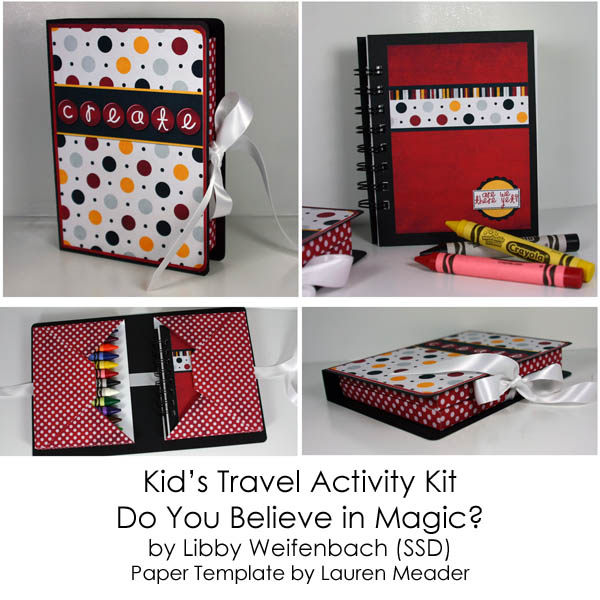
Hey Sharon Kay! I just now saw this. Sorry!!! I'm going to PM you now. But for those of you who are curious...my box is no thicker than Lauren's template! I printed out the templates (there are 2 "parts" - 1 for the "cover" and 1 for the "pockets") on plain white cardstock and cut them out to make a pattern. For this project, I just used black cardstock for my "book" cover, cutting and scoring as instructed in the templates. I printed out the polka dot papers for the pockets to cover an entire 8.5x11 sheet, then traced my pattern, cut out, and assembled. I glued a ribbon down to the inside of the cover before adhering my pockets. Using my finished pockets as a guide for size, I cut a front and back cover for the notebook and then just cut out about 25 sheets of plain copy paper for the inside pages. I used my bind-it-all to bind the notebook.
The cover of the notebook and the outside of the whole thing I designed digitally in PSE, sizing my document so it fit the fronts of each, then printed and glued down. That's it!! The crayons fit inside the pocket PERFECTLY!!! (they're the large toddler crayons). The only thing I wish I would have done differently is somehow figured out a way to put a top or flap on the crayon pocket. As it is, when you close it up, if you lift up that left side first, the crayons want to slide out as you close it....so you have to be careful to close it the opposite way (not sure if this makes sense, but you'll see what I mean when you're done).
I'm still not sure how practical this is for my 2-yr-old (ha!), but I think it would make the CUTEST gift and for a slightly older child would be GREAT!!!
")