

|
#1
 08-20-2008, 02:09 PM
|
||||
|
||||
|
When I save my LO's for myself I save them in a high quality PNG. But to load them onto the galleries here, I have to lower the quality. When I look at my LO's after they are loaded, sometimes the text looks "fuzzy"...what can I do to prevent that? Or can I?
Is there a trick to keep the crispness to the LO.... 
__________________

|


|
#3
08-20-2008, 02:13 PM
|
||||
|
||||
|
I use PSPX2 and use the JPEG optimizer to save my for web photos...not sure if any of the other programs have anything like that.
When I save for web I actually keep my resolution at 300 (just forget to change it) and then the JPEG optimizer allows me to get the size down within the upload limits without losing much picture quality at all. I upload at 600x600 too. Not sure if that helps...
__________________
 
|

|
#4
08-20-2008, 02:14 PM
|
||||
|
||||
|
Have you resized it down to 500x500 or 600x600 pixels? Then you should be able to keep the quality fairly high.
Personally, I prefer to resize adn save for web using Irfanview over the PSE editor. It always looks better when I do it that way... not as pixelated. It's free: http://www.irfanview.com/
__________________
-It's pronounced Meeeegan... get it RIGHT! 
|

|
#5
08-20-2008, 02:39 PM
|
||||
|
||||
|
I've noticed that changing the quality down does not make the file smaller so I just leave mine at 300. I use PSPX2 also and I know when I create my text as a Vector, when I resize my layout the text gets fuzzy and distorted, so I make sure I change my text layer to a Raster and it stays pretty much the same on resize. Since I don't know what program you use, I don't know if that helped or not.
__________________

|

|
#6
08-20-2008, 02:47 PM
|
||||
|
||||
|
i always scrap in 300 resolution then i resize on the program megan does...irfanview. i just resize it to 600x600 and save as a JPEG. they look pretty crisp that way.
__________________
    
|

|
#7
08-20-2008, 02:52 PM
|
||||
|
||||
|
I follow these steps that Jessica Sprague uses. Someone made them into an action a while ago, so I just use that. I've also made my own action following the steps and scaling it down to 600x600 cuz that's what designers here need for store previews. Anyway, I copy and pasted it, here ya go
To Prepare a Layout to Post Online 1. Make sure you have saved your final .psd. You'll have to go through all these steps again every time you save for the web. Oh, and make SURE you have this original saved in a safe place.  2. Change the image size from 300 to 72 dpi (Image>Image Size). Be sure to uncheck the resample image box. Your layout dimensions will change to something like 50 x 50 inches, but we'll take care of that in a second. 3. Flatten the image. (Layer>Flatten Image) 4. Hit Ctrl-A to select all. 5. Go to Edit > Transform > Scale. Choose 25% for height and width. Always use the scale rather than just changing the image size using Image Size. The algorithm Adobe uses for scaling is just a lot better. A lot clearer. A lot more accurate. (I use 15% for galleries which is 540x540, and 16.66667% for 600x600 - it's 602 but I change that in the save for web box) 6. Run an unsharp mask to sharpen. I usually use 85%, radius 1, threshold 4 (this is the "All-purpose sharpening" recommended by Scott Kelby). You can run this twice if you need a little extra sharpening boost. 7. Save for Web. (File > Save for Web) There is a slider that allows you to determine the compression level, and thus affect your file size. I can usually get a 12x12 layout in the 150-250K range at about 60% quality. If you have a file size requirement that is smaller than this, go back and scale your layout down a bit and try it again. 8. Hit OK. Now back at your layout, go back in the History palette and click on the step just BEFORE the Image Size step to keep working. Or if you're all done with this layout, close it without saving (assuming you remembered to save right before the web-prep steps). DO NOT save your flattened layout, or you will be very sad later on. Trust me on that one. And there it is. A lot of steps, but your layouts that look awesome at full resolution can now be shared online and look just as awesome. ETA: Instead of using the slider to get the file size down, I click on the arrow on the right next to optimize and select a file size of 150k. Depending on how busy your LO is (lots of elements, shadows, etc) will depend on what quality you end up with. Simpler LO's can have a quality as high as 85%, while super busy LO's will be down in the low 70's and 60's. Plus, since it's a small pixel dimension, you can keep the quality higher than if you went wtih 600x600 to start. (I put the quality at 100% when I save to 600 for designers store previews cuz that's a different thing)
__________________
~Colleen~
Re-attempting a creative life after far too long! Last edited by ColleenSwerb; 08-20-2008 at 02:56 PM.
|


|
#8
08-20-2008, 02:58 PM
|
||||
|
||||
|
I've been using Annie Manning's Resize for Web action. I love that it includes a step to increase the desaturation because CS3's Save for Web pretty much kills the color. It makes it really easy.
 There's an Elements version too. There's an Elements version too.
|

|
#9
08-20-2008, 03:11 PM
|
||||
|
||||
|
My steps are pretty simple, in PSCS3, I go to Image size... first change the resolution to 72 and then the pixel size to 600. Then I save for the web. Then just ctrl+alt+z to put everything back to original size.
__________________

|

|
#10
08-20-2008, 03:14 PM
|
||||
|
||||
|
Here is a tutorial I wrote a long time ago on this. It's with PSCS2, but it works for CS3 too. Once you have completed your work, I recommend saving 2 copies. The first copy is a PSD type (photoshop document) that contains all of the layers you have worked with and the other is a jpg, which is a flattened imaged that cannot be edited with the same ease. By saving the PSD document you can easily go in and make changes as necessary. Some people "clean" these out after they are sure they will not need to make any additional changes. The DPI of the originial document doesn't matter, it's only the pixel dimensions. 3600x3600 has the same amount of data regardless .... the DPI only matters for print output.
How to optimize (screen shots are with gif, but it works for all file types): 1. Go to File -> Save for the Web 2. Select the arrow icon on the far right 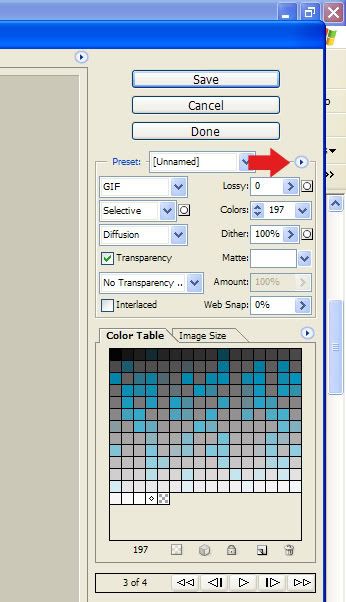 3. Then select optimize to file size 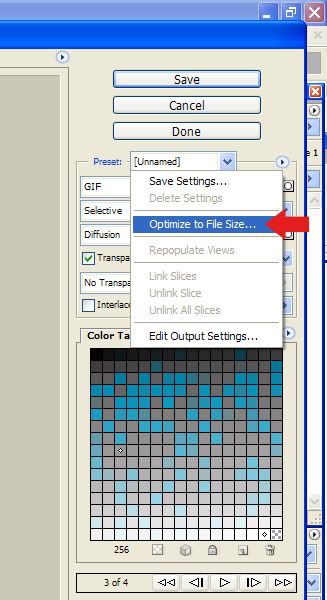 4. Select the desired file size (either pixel dimensions or %) you wish to optimize to & hit "save". I save most of my LOs at 600x600 or 14% (504x504). 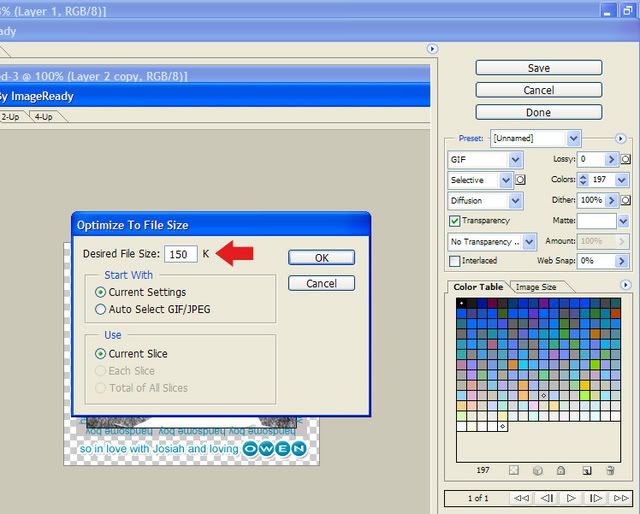 5. OPTIONAL. 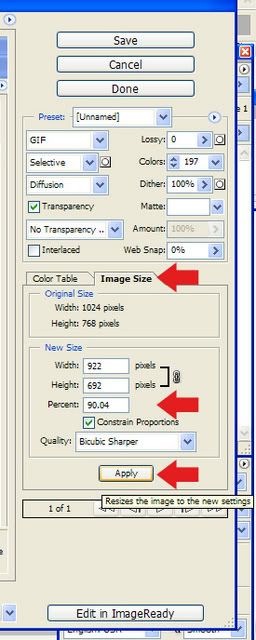
__________________

|

|
#11
08-20-2008, 03:40 PM
|
||||
|
||||
|
I do the same thing Sherri does kinda..
I resize my flatted 300dpi LO to 500x500 filter-sharpen save for web optimize to file size-150kb and it'll save at the highest quality and stay as close to 150kb as it can (150kb is normally the max file size for online galleries)-then hit ok to save!
__________________
|


|
#12
08-20-2008, 03:45 PM
|
||||
|
||||
|
I use adobe 7.0
__________________
|
|
#13
08-20-2008, 03:52 PM
|
||||
|
||||
|
I wanted to add, if you do this image resize option in the optimizing window (which I recommend in lieu of resizing the document on your actual canvas since you don't have to fiddle with the doucment itself -- no flattening nor resizing is necessary), do it first before you optimize to 150kb. Use "bicubic sharper" on the bottom, since it's compatible with resizing down (it will resample and give you the best quality) .... then move to the optimizing feature.
Amy, does PS7 have this feature?
__________________
|
|
#14
08-20-2008, 04:13 PM
|
||||
|
||||
|
awesome! thank you so much! i was getting discouraged because of how fuzzy things were looking, and other peoples looked crisp
next LO I will try it!!!
__________________
|


 |
«
Previous Thread
|
Next Thread
»
 Linear Mode

|
|

All times are GMT -4. The time now is 02:40 PM.