Sweet Shoppe Designs


Go Back   Sweet Shoppe Community > Candy Coated Conversation > A Sweet Little Community
Register FAQ Community Calendar Today's Posts Search

Reply
 
Thread Tools Display Modes
  #1  
Old 03-14-2011, 05:18 PM
nun69's Avatar
nun69 nun69 is offline
Sweetsaholic
 
profile gallery send pm
Join Date: Jan 2008
Location: Roanoke, VA
Posts: 10,044
Send a message via Yahoo to nun69
Default Camera Guru's!!!

tell me how to get good indoor pictures??????DO I have to use my speedlite all the time? Like this picture of Peyton in the bathtub, I used my speedlight bounced off the ceiling, but it is still yellow...HELP me!~~~


and these I took at the Children's Museum without my flash....


these were all taken with my Tamron 28-75 mm.....
Reply With Quote
  #2  
Old 03-14-2011, 05:45 PM
KateD's Avatar
KateD KateD is offline
Sweet Talker
 
profile gallery send pm
Join Date: Jun 2010
Location: Belgium
Posts: 2,125
Default

I'm no camera guru, but I have had my fair share of experience with off-colored pictures. How do you have the white balance set? I usually keep my WB on auto, but sometimes get better pics if I actually set it manually.
Reply With Quote
  #3  
Old 03-14-2011, 05:45 PM
heathergw's Avatar
heathergw heathergw is offline
Jabber-Jawbreaker
 
profile gallery send pm
Join Date: Sep 2009
Location: Chicago Burbs
Posts: 8,639
Default

you should have something in your camera menu for changing the white balance to tungsten or whatever kind of lights you have in your bathroom... I usually just shoot in RAW so that I can color correct in Photoshop...

some people have a grey card that you can use to set the white balance on your camera... but you have to reset it every time your lighting changes.
__________________
Reply With Quote
  #4  
Old 03-14-2011, 06:11 PM
nun69's Avatar
nun69 nun69 is offline
Sweetsaholic
 
profile gallery send pm
Join Date: Jan 2008
Location: Roanoke, VA
Posts: 10,044
Send a message via Yahoo to nun69
Default

I had the WB set for tungsten, but to me they still look yellow....maybe it is something I can just fix in PS?
Reply With Quote
  #5  
Old 03-14-2011, 07:07 PM
aggiefamily's Avatar
aggiefamily aggiefamily is offline
Sweet Talker
 
profile gallery send pm
Join Date: Feb 2007
Posts: 1,952
Default

Quote:
Originally Posted by nun69 View Post
I had the WB set for tungsten, but to me they still look yellow....maybe it is something I can just fix in PS?
You can try Auto Color, Auto Tone in PS to correct.

On camera I very seldom will use Tungsten but do try out the other settings. About 80% of the time I just keep it on AWB.
__________________
Amanda
Reply With Quote
  #6  
Old 03-14-2011, 08:09 PM
heathergw's Avatar
heathergw heathergw is offline
Jabber-Jawbreaker
 
profile gallery send pm
Join Date: Sep 2009
Location: Chicago Burbs
Posts: 8,639
Default

are your ceilings true white? What color are your bathroom walls?

and yeah, I keep mine at AWB too
__________________
Reply With Quote
  #7  
Old 03-14-2011, 08:12 PM
nikkiARNGwife's Avatar
nikkiARNGwife nikkiARNGwife is offline
Jabber-Jawbreaker
 
profile gallery send pm
Join Date: May 2007
Posts: 8,023
Default

Inside I use a grey card usually...I shoot in RAW though and usually don't sweat it too much and just correct it in lightroom
__________________


Reply With Quote
  #8  
Old 03-14-2011, 08:17 PM
nun69's Avatar
nun69 nun69 is offline
Sweetsaholic
 
profile gallery send pm
Join Date: Jan 2008
Location: Roanoke, VA
Posts: 10,044
Send a message via Yahoo to nun69
Default

nikki, can you enlightne me on using a grey card because your indoor pics are AMAZING!!!!

and Heather, my ceilings are probably an off white and so is my bathrrom ceiling, but my walls int he bathroom are light blue and there is NO natural light in there....come to think of it, my flas might have bounced off of the tub which is really off white....
Reply With Quote
  #9  
Old 03-14-2011, 08:27 PM
sprauncey1's Avatar
sprauncey1 sprauncey1 is offline
Sweet Talker
 
profile gallery send pm
Join Date: Nov 2008
Location: Bordertown in Texas
Posts: 1,779
Default

Yep auto-white balance inside doesn't work very well. To custom white balance, you set your camera to custom white balance setting and then take a photo of the gray card in the light with the gray card filling the viewfinder. It may not get you perfect but it will get you close. And it will change depending on the different light sources lighting the photo.

To get a decent indoor shot without flash, you absolutely have to up your ISO High and keep your shutter speed at least at 160 (I usually seem to do better with 200 with my boys) with kiddos moving around (not sweet little posers). The noise of the higher ISO is dealable but motion blur really isn't! And if you tend to under-expose make sure you use exposure compensation to not under expose because that is where the noise comes in. Keep your aperture as low as you can go with the number of people you want in focus (large group, larger aperture number). I believe your Tamron goes to 2.8 so that is where I'd keep it most of the time.

Yes bounce the flash off the ceiling and even then up your ISO some to get less harsh flash.

Hope that helps! Indoors at night with moving kiddos = one of the hardest things to shoot properly I've found. Just less light to deal with and less room for error.

Oh and check out this photo (ISO is set to 5000):

NO flash, dim morning light is all I had. I had some noise but removed it with CS5 Adobe Camera Raw.

I have learned soooooo much about shooting manually in the last year! I'm still learning too!
Reply With Quote
  #10  
Old 03-14-2011, 08:36 PM
sprauncey1's Avatar
sprauncey1 sprauncey1 is offline
Sweet Talker
 
profile gallery send pm
Join Date: Nov 2008
Location: Bordertown in Texas
Posts: 1,779
Default

And I just did a quick test of my boys in the bath and yes mine on Auto shows yellow, quick custom on the white tub makes them much better (if a little cool but still better).

before:

after:


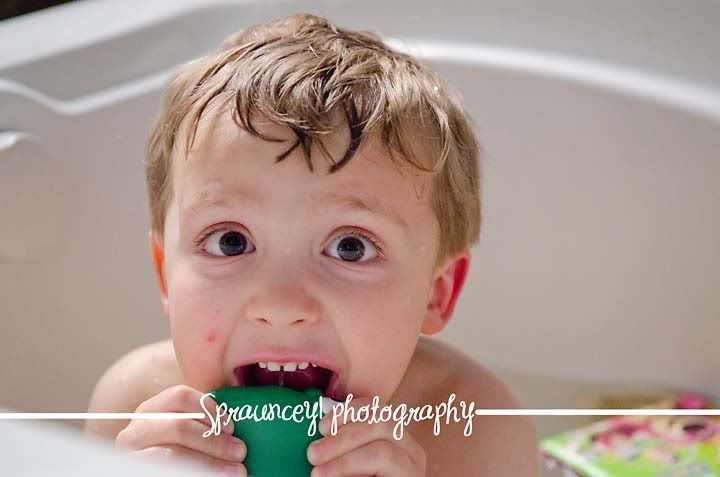
before with white balance adjusted in Adobe Camera Raw:


But the thing is if your white balance is way off you can tend to blow a channel more easily (red in particular) so that is why it is better to get it close in camera in the first place. And my ISO setting was 3200 for all of these. My bathroom is not bright at all and I wished I had a reflector as well (I still need to buy one!)

Last edited by sprauncey1; 03-14-2011 at 08:59 PM.
Reply With Quote
  #11  
Old 03-14-2011, 08:52 PM
nun69's Avatar
nun69 nun69 is offline
Sweetsaholic
 
profile gallery send pm
Join Date: Jan 2008
Location: Roanoke, VA
Posts: 10,044
Send a message via Yahoo to nun69
Default

so I guess I need to figure out how to do this custom WB Also, with and ISO of 5000, isn't you picture really grainy? I was always under the impression you always wanted to try to shoot at a low ISO....enlightne me girls
Reply With Quote
  #12  
Old 03-14-2011, 08:56 PM
ColleenSwerb's Avatar
ColleenSwerb ColleenSwerb is offline
Brodo gettin her Swerb on
 
profile gallery send pm
Join Date: Aug 2007
Location: Maryland
Posts: 13,078
Send a message via Yahoo to ColleenSwerb
Default

She used PS to smooth out the grainy-ness. See how smooth his hair is on his temple? That's how you can tell. Also, you can up your ISO to varying degrees before you start to have a real issue with grain. I would take a bunch of test shots of the same item, in the same light, with different ISO's and then take a look at them. Each camera handles ISO differently (even within the same model).

I shoot on auto white balance all the time (haven't invested in a grey card yet), and adjust to suit my taste in LR or PS. I shoot RAW, so it's super simple to change the WB (and I don't care if that doesn't make me a "professional" who gets WB perfect every time, lol).
__________________
~Colleen~
Re-attempting a creative life after far too long!

Last edited by ColleenSwerb; 03-14-2011 at 08:58 PM.
Reply With Quote
  #13  
Old 03-14-2011, 09:07 PM
nun69's Avatar
nun69 nun69 is offline
Sweetsaholic
 
profile gallery send pm
Join Date: Jan 2008
Location: Roanoke, VA
Posts: 10,044
Send a message via Yahoo to nun69
Default

I ghaven't figured out how to really shoot in RAW and change things...DH is going to buy me a MAC when we get our taxes back so I am waiting to upgarde to CS5 and LR3 until then...so I guess it really is just a learning curve and I need to practice...I really don't mind shooting at the high ISO if I could figure out how to get rid of the grainyness
Reply With Quote
  #14  
Old 03-14-2011, 09:21 PM
Janet Phillips's Avatar
Janet Phillips Janet Phillips is offline
Sweet Shoppe Designer
 
profile gallery send pm
Join Date: Nov 2009
Location: In America...for now
Posts: 1,152
Default

Yep, definitely a white balance issue. You've gotten some good advice about ways to correct it in camera (or in LR if you start shooting in RAW).

And now is my lazy photographer advice...these are salvageable. Not sure what program you use, but PSE has a simple little "Remove Color Cast" option where you click on something that is supposed to be white and it fixes the photo for you. I use it a LOT.

Here is my 10 second edit of your bath photo. In PSE, all I did was a Remove Color cast, a levels adjustment, and a slight brightness boost.


So for any of you PSE users out there, it's a great little tool!

And for removing noise, I use Noiseware. I'd rather get better exposure + noise than bad exposure. Noiseware clears a lot of it up! But again, this is LAZY PHOTOGRAPHER advice. This is what I do since I only shoot my kids and I shoot hundreds of photos a month. If I were on a paid/professional shoot I would shoot in RAW and do more than 10-15 second edits!
__________________

Reply With Quote
  #15  
Old 03-14-2011, 09:37 PM
sprauncey1's Avatar
sprauncey1 sprauncey1 is offline
Sweet Talker
 
profile gallery send pm
Join Date: Nov 2008
Location: Bordertown in Texas
Posts: 1,779
Default

Quote:
Originally Posted by ColleenSwerb View Post
She used PS to smooth out the grainy-ness. See how smooth his hair is on his temple? That's how you can tell. Also, you can up your ISO to varying degrees before you start to have a real issue with grain. I would take a bunch of test shots of the same item, in the same light, with different ISO's and then take a look at them. Each camera handles ISO differently (even within the same model).
Yep what she said about the testing your camera. That is why I shot that one at 5000, I just kept bumping it up until I got one that wasn't underexposed. And yep I totally smoothed out the hair, but I kinda liked it that way made if feel like a painting somehow. Course that was also before I knew about a few tweeks to the noise removal in ACR.

Don't be afraid to shoot RAW for a few shots (in one of your menus you change the quality to RAW) and play around with it in your PSE. If for some reason your program won't recognize the files, Adobe has a Raw converter to DNG files that photoshops will read. Now like Janet said, it does take more time to shoot Raw and process (not to mention they are bigger) but they have saved my rear a time or two when I totally blew a shot.

Oh and I AM NOT a pro, just a MWAC who has learned a ton and likes to share (maybe a little too much at once) LOL!!
Reply With Quote
  #16  
Old 03-14-2011, 09:45 PM
nun69's Avatar
nun69 nun69 is offline
Sweetsaholic
 
profile gallery send pm
Join Date: Jan 2008
Location: Roanoke, VA
Posts: 10,044
Send a message via Yahoo to nun69
Default

Quote:
Originally Posted by Janet Phillips View Post
Yep, definitely a white balance issue. You've gotten some good advice about ways to correct it in camera (or in LR if you start shooting in RAW).

And now is my lazy photographer advice...these are salvageable. Not sure what program you use, but PSE has a simple little "Remove Color Cast" option where you click on something that is supposed to be white and it fixes the photo for you. I use it a LOT.

Here is my 10 second edit of your bath photo. In PSE, all I did was a Remove Color cast, a levels adjustment, and a slight brightness boost.


So for any of you PSE users out there, it's a great little tool!

And for removing noise, I use Noiseware. I'd rather get better exposure + noise than bad exposure. Noiseware clears a lot of it up! But again, this is LAZY PHOTOGRAPHER advice. This is what I do since I only shoot my kids and I shoot hundreds of photos a month. If I were on a paid/professional shoot I would shoot in RAW and do more than 10-15 second edits!
OMG.....this is sooo what I am looking for in post processing....does anybody know the steps I can use in CS2 {I am going to upgrade, but haven't had the cahnce}.....
Reply With Quote
  #17  
Old 03-14-2011, 09:57 PM
heathergw's Avatar
heathergw heathergw is offline
Jabber-Jawbreaker
 
profile gallery send pm
Join Date: Sep 2009
Location: Chicago Burbs
Posts: 8,639
Default

I'd be shocked if CS2 didn't have a white balance tool... look for a little grey dropper.

I'm a PSE user and I do the same thing that Janet does. I LOVE that option!
__________________
Reply With Quote
  #18  
Old 03-14-2011, 10:12 PM
nun69's Avatar
nun69 nun69 is offline
Sweetsaholic
 
profile gallery send pm
Join Date: Jan 2008
Location: Roanoke, VA
Posts: 10,044
Send a message via Yahoo to nun69
Default

my eyes have been opened!!!
Reply With Quote
  #19  
Old 03-14-2011, 10:16 PM
sprauncey1's Avatar
sprauncey1 sprauncey1 is offline
Sweet Talker
 
profile gallery send pm
Join Date: Nov 2008
Location: Bordertown in Texas
Posts: 1,779
Default

That is one thing that CS2 (CS5) etc doesn't have exactly. Kinda like the photo bin, one of the few things I miss from PSE!!

But you can open them up in Adobe Camera RAW (part of CS2) and do it there, then open them in photoshop. You just select the little dropper tool at the top that says white balance tool. Auto color in main CS2 also works most of the time! And I used to have CS2 and CS5 is not that much different in that respect, except it doesn't have to open full bridge to use ACR.

So either use Auto Color or Open in ACR and use the white balance dropper tool and open in CS2 then....
Adjust Levels (Control - L)
Adjust brightness (Brightness/Contrast under Image - Adjustments
Reply With Quote
  #20  
Old 03-14-2011, 10:38 PM
nun69's Avatar
nun69 nun69 is offline
Sweetsaholic
 
profile gallery send pm
Join Date: Jan 2008
Location: Roanoke, VA
Posts: 10,044
Send a message via Yahoo to nun69
Default

so I did this, am I getting there>


and this one...I know I need to play around more, but these literraly took less than a minute each


and here is one I played with quickly with the bathtub photo...

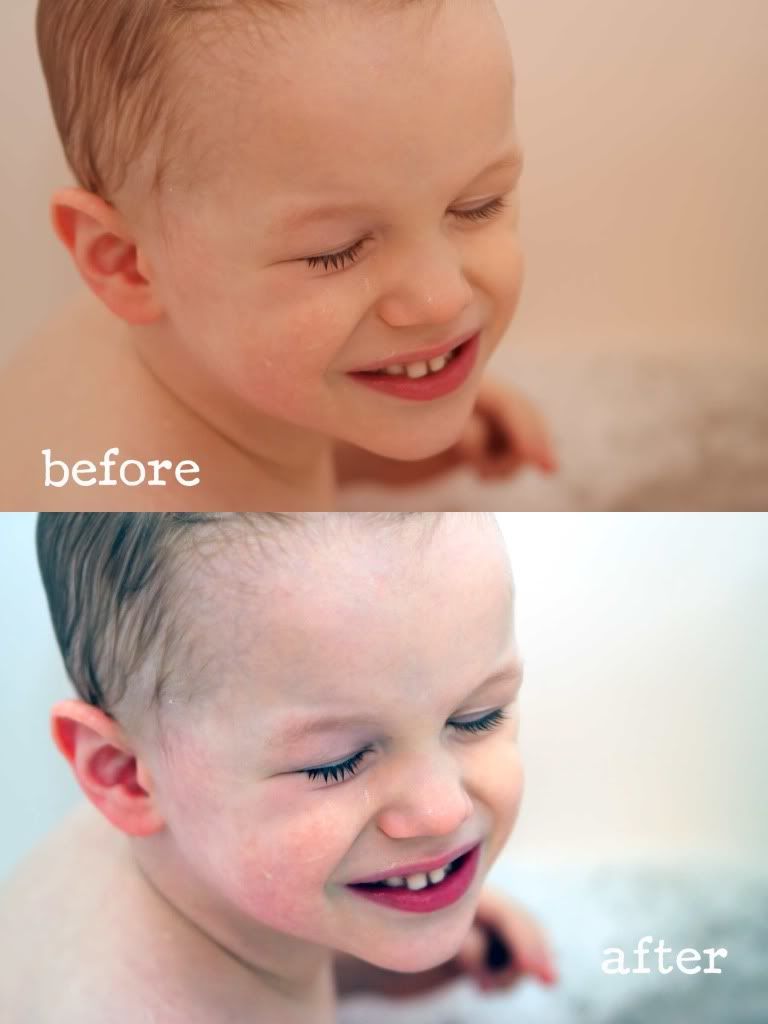
Last edited by nun69; 03-14-2011 at 10:51 PM.
Reply With Quote
  #21  
Old 03-14-2011, 10:53 PM
MissKim's Avatar
MissKim MissKim is offline
Sweet Talker
 
profile gallery send pm
Join Date: Mar 2007
Posts: 1,690
Default

Totally butting in on the "not a professional photographer and I don't shoot in RAW" bandwagon here, but I'd rather bump the ISO up and edit out the noise using Noiseware than miss the shot due to blur or (even worse) use my flash. I am so a natural light person.
__________________
Reply With Quote
  #22  
Old 03-14-2011, 11:50 PM
kresta's Avatar
kresta kresta is offline
Sweet Talker
 
profile gallery send pm
Join Date: Feb 2007
Posts: 2,489
Default

Don't forget you can also adjust JPG images in your CameraRaw editor. I used to shoot RAW all the time, but someone here mentioned that you can do it this way (I think Gr8Beckie?), so now I just shoot JPG, open it in CameraRaw, and edit as needed. Just go in photoshop (or PSE for me), Open, then in the little drop-down menu for the "Format", just choose Camera Raw. Often just clicking "Auto" for the white balance there will do the trick. Sometimes it errs on the too-cool side for me, so I start there and then adjust to how I like it. Hope that helps!
__________________

My Blog -- Three 4 Me

Proudly creating for Zoe Pearn
Reply With Quote
  #23  
Old 03-15-2011, 12:08 AM
nun69's Avatar
nun69 nun69 is offline
Sweetsaholic
 
profile gallery send pm
Join Date: Jan 2008
Location: Roanoke, VA
Posts: 10,044
Send a message via Yahoo to nun69
Default

Quote:
Originally Posted by kresta View Post
Don't forget you can also adjust JPG images in your CameraRaw editor. I used to shoot RAW all the time, but someone here mentioned that you can do it this way (I think Gr8Beckie?), so now I just shoot JPG, open it in CameraRaw, and edit as needed. Just go in photoshop (or PSE for me), Open, then in the little drop-down menu for the "Format", just choose Camera Raw. Often just clicking "Auto" for the white balance there will do the trick. Sometimes it errs on the too-cool side for me, so I start there and then adjust to how I like it. Hope that helps!
I can't find how to do this in CS2...hopefully somebdoy will chime in and tell me how to do this
Reply With Quote
  #24  
Old 03-15-2011, 08:03 AM
KateD's Avatar
KateD KateD is offline
Sweet Talker
 
profile gallery send pm
Join Date: Jun 2010
Location: Belgium
Posts: 2,125
Default

I use CS5 and I have to go into bridge, right-click (I think) on the image, and select "open with camera raw". The exact wording may be off, but that's the general idea.

I'd still recommend shooting in RAW rather than JPG because the RAW format captures more of the picture information and you can get better edited pictures that way. I've had photos (RAW) that were almost black, and was able to salvage the photo.
Reply With Quote
  #25  
Old 03-15-2011, 08:14 AM
Leontine78's Avatar
Leontine78 Leontine78 is offline
Sugar Rush
 
profile gallery send pm
Join Date: Nov 2008
Location: Holland
Posts: 942
Default

Thanks everyone for these lessons! I have a external flasher since two weeks and saw my pictures turning yellow/orange.

As with white balance. I have black and white cats and that's rather difficult. I put my white balance on +0,67 or +1. Then the white is not so white anymore. But that's the other way around here.
__________________
Hugs,
Leontine
Reply With Quote
  #26  
Old 03-15-2011, 08:44 AM
mummytothree's Avatar
mummytothree mummytothree is offline
Jabber-Jawbreaker
 
profile gallery send pm
Join Date: Oct 2007
Location: Pennsylvania
Posts: 5,272
Send a message via MSN to mummytothree
Default

Quote:
Originally Posted by heathergw View Post
I'd be shocked if CS2 didn't have a white balance tool... look for a little grey dropper.

I'm a PSE user and I do the same thing that Janet does. I LOVE that option!
Me too and I also use "adjust color for skin tone..." a lot too!!!
__________________

Elizabeth


Blogging for Kristin Cronin-Barrow
Reply With Quote
  #27  
Old 03-15-2011, 09:03 AM
nikkiARNGwife's Avatar
nikkiARNGwife nikkiARNGwife is offline
Jabber-Jawbreaker
 
profile gallery send pm
Join Date: May 2007
Posts: 8,023
Default

This is my grey card I got it about 2 years ago and I LOOVVEE it. It's always with me and now it's just habit to set my white balance first, remove the cap and shoot away.


Here's one from this week SOOC - this is in my fairly dark living room but close to a window.. it's a little blurry but I think fairly well for an inside pic camera settings: ISO 1600 f/2.0


and with just some quick tweaking in lightroom...
__________________


Last edited by nikkiARNGwife; 03-15-2011 at 09:17 AM.
Reply With Quote
  #28  
Old 03-15-2011, 09:29 AM
Teresa's Avatar
Teresa Teresa is offline
Sweet Talker
 
profile gallery send pm
Join Date: Jan 2007
Posts: 3,066
Default

Quote:
Originally Posted by nun69 View Post
I can't find how to do this in CS2...hopefully somebdoy will chime in and tell me how to do this
I tried to figure this out last night too. In CS4, I opened Bridge, found my photo, clicked on it and hit control+R to open in Camera Raw. You can also go to File-Open in Camera Raw or right click on the photo and choose "Open in Camera Raw" as Kate said.

One thing I'm still trying to figure out that seems so simple...how do I keep a copy of the original photo without duplicating the photo in Bridge before even opening it in Camera Raw? Once I make a change it seems to keep them...

Great discussion!
Reply With Quote
  #29  
Old 03-15-2011, 09:42 AM
sprauncey1's Avatar
sprauncey1 sprauncey1 is offline
Sweet Talker
 
profile gallery send pm
Join Date: Nov 2008
Location: Bordertown in Texas
Posts: 1,779
Default

Quote:
Originally Posted by nikkiARNGwife View Post
This is my grey card I got it about 2 years ago and I LOOVVEE it. It's always with me and now it's just habit to set my white balance first, remove the cap and shoot away.

LOL ah the old white balance lens cap! I lost mine and the new one is on back-order which is why I have been playing with auto white balance lately! I LOVE LOVE LOVE this thing (except it doesn't work well in REALLY low light I've found). But like I said, I've ordered another because I cannot stand being without it!

Last edited by sprauncey1; 03-15-2011 at 09:53 AM.
Reply With Quote
  #30  
Old 03-15-2011, 09:50 AM
sprauncey1's Avatar
sprauncey1 sprauncey1 is offline
Sweet Talker
 
profile gallery send pm
Join Date: Nov 2008
Location: Bordertown in Texas
Posts: 1,779
Default

Quote:
Originally Posted by Teresa View Post
I tried to figure this out last night too. In CS4, I opened Bridge, found my photo, clicked on it and hit control+R to open in Camera Raw. You can also go to File-Open in Camera Raw or right click on the photo and choose "Open in Camera Raw" as Kate said.

One thing I'm still trying to figure out that seems so simple...how do I keep a copy of the original photo without duplicating the photo in Bridge before even opening it in Camera Raw? Once I make a change it seems to keep them...

Great discussion!
From what I read in my Scott Kelby book, when you open in Camera RAW your jpeg file, you need to click OPEN when done not DONE to open in Photoshop and then save as. To be absolutely safe you should duplicate, but if you don't want to have a bunch of doubles then you can Open in Camera Raw, do edits, click Open in Photoshop and then immediately save as. Test this first for me, this is just what I've been reading in my CS5 book and it should work in CS2.

Also do you have the option of Open As in CS2? If you do then in regular Photoshop you can click that and then in the file type drop down box, select Camera Raw and it will open it from Photoshop (no need to run Bridge) and into Camera RAW. Try it and see, again I'm reading from the CS5 book, but I do believe it is the same for CS2 from what I remember.
Reply With Quote
  #31  
Old 03-15-2011, 10:04 AM
heathergw's Avatar
heathergw heathergw is offline
Jabber-Jawbreaker
 
profile gallery send pm
Join Date: Sep 2009
Location: Chicago Burbs
Posts: 8,639
Default

just remember that shooting in jpeg means you're losing info in your picture to make the file size smaller... it also means that you are letting your camera decide what info is lost and how to edit that picture... so when you edit in Camera Raw you've already lost that info and your editing options are limited to what's available in the picture so an underexposed photo has lost a ton of info and much of the detail is gone... the reason Kate has an easy time saving a majorly underexposed picture is because all the info is intact. Yes, the file size is larger but it's for good reason If you're worried about space then delete the bad pics and only save the ones that you actually like and will use.

If you want to see what your camera does with your jpeg pictures... switch it to saving as RAW and jpeg for awhile and you'll see the differences between the actual photo you take and the one partially edited by your camera.
__________________
Reply With Quote
  #32  
Old 03-15-2011, 10:26 AM
glumirk's Avatar
glumirk glumirk is offline
Sweet Talker
 
profile gallery send pm
Join Date: Jul 2008
Location: New Hampshire
Posts: 1,091
Default

The RAW editor can do a lot for JPEGS, but it can do soooo much more for RAW files. And once you've got some basic editing done, you can save it as a JPEG and then throw the RAW away. Then you can play around some more and not have to take up the harddrive space.
__________________
Reply With Quote
  #33  
Old 03-15-2011, 10:30 AM
sprauncey1's Avatar
sprauncey1 sprauncey1 is offline
Sweet Talker
 
profile gallery send pm
Join Date: Nov 2008
Location: Bordertown in Texas
Posts: 1,779
Default

Quote:
Originally Posted by heathergw View Post
just remember that shooting in jpeg means you're losing info in your picture to make the file size smaller... it also means that you are letting your camera decide what info is lost and how to edit that picture... so when you edit in Camera Raw you've already lost that info and your editing options are limited to what's available in the picture so an underexposed photo has lost a ton of info and much of the detail is gone... the reason Kate has an easy time saving a majorly underexposed picture is because all the info is intact. Yes, the file size is larger but it's for good reason If you're worried about space then delete the bad pics and only save the ones that you actually like and will use.

If you want to see what your camera does with your jpeg pictures... switch it to saving as RAW and jpeg for awhile and you'll see the differences between the actual photo you take and the one partially edited by your camera.
This is always a thing in photography I guess. JPEG for ease and size vs RAW for editing/saving capability. That is why I agree, you need to test it out and see what works for you. Me...I am not confident on my shooting capability to get "that shot where my boys are actually looking at me together" every time, and have been burned in the past by jpeg. So I shoot RAW. But I do hate myself when I have 3-6 months of photos to process when I get busy and I want to scrap them NOW. But that is my own fault for letting it get that far.

I need to install/relearn PSE8 so I can get a better grip on what that program can do (for friends asking). It has been so long since I've used it and they have made so many upgrades.

Angie, if you really want to learn this stuff, I would get a trial membership to ClickinMoms. That is where I learned all this stuff and wow it has been such an eye opener. Easy to get overwhelmed with info, but take it one subject at a time. There is no way you can learn all this in one night/week/month! But you do have the advantage of being familiar with Photoshop/PSE. And play play play! Play with inanimate objects too, since they don't move and you can take a million photos without them complaining!
Reply With Quote
  #34  
Old 03-15-2011, 11:14 AM
nun69's Avatar
nun69 nun69 is offline
Sweetsaholic
 
profile gallery send pm
Join Date: Jan 2008
Location: Roanoke, VA
Posts: 10,044
Send a message via Yahoo to nun69
Default

thanks for all the advice girls.....I am taking a photography class starting the end of the month and I have taken a digital phtoography class int he past, so I have a good basis, I just want to learn more and I know there are lots of easy things out there, I just need to find them I am totally gonna keep practicing. I did shoot in RAW for awhile and I did NOT like it. So maybe once I learn the whole post processign part and I can do it quick, then maybe that is what I will start shooting in

I belong to ilopvephotography.com and I have learned quite a bit over there but sometimes they are a little too technical for me

again thanks so much for the help, I think I will be buying one of those grey card things
Reply With Quote
  #35  
Old 03-15-2011, 12:21 PM
Nettio's Avatar
Nettio Nettio is offline
Jabber-Jawbreaker
 
profile gallery send pm
Join Date: Feb 2007
Location: Texas
Posts: 7,196
Default

Quote:
Originally Posted by sprauncey1 View Post
But you can open them up in Adobe Camera RAW (part of CS2) and do it there, then open them in photoshop. You just select the little dropper tool at the top that says white balance tool. Auto color in main CS2 also works most of the time! And I used to have CS2 and CS5 is not that much different in that respect, except it doesn't have to open full bridge to use ACR.

So either use Auto Color or Open in ACR and use the white balance dropper tool and open in CS2 then....
Adjust Levels (Control - L)
Adjust brightness (Brightness/Contrast under Image - Adjustments
You can also use Adjustment Layers for these (the half black/half-white circle at the bottom of the layers palette). The advantage is that Adjustment Layers are non-destructible and editable so you can tweak until you get the photo exactly the way you want.
Reply With Quote
  #36  
Old 03-15-2011, 12:40 PM
newfiemountiewife's Avatar
newfiemountiewife newfiemountiewife is offline
Jabber-Jawbreaker
 
profile gallery send pm
Join Date: May 2007
Location: In the loony bin
Posts: 8,824
Send a message via MSN to newfiemountiewife Send a message via Yahoo to newfiemountiewife
Default

This is why I always shoot in RAW because my pictures are bad...I don't know what I'm doing regarding white balance LOL. I find I'm better in PS than I am taking the pictures, if that makes sense!
__________________
Reply With Quote
  #37  
Old 03-15-2011, 05:40 PM
ColleenSwerb's Avatar
ColleenSwerb ColleenSwerb is offline
Brodo gettin her Swerb on
 
profile gallery send pm
Join Date: Aug 2007
Location: Maryland
Posts: 13,078
Send a message via Yahoo to ColleenSwerb
Default

Quote:
Originally Posted by Nettio View Post
You can also use Adjustment Layers for these (the half black/half-white circle at the bottom of the layers palette). The advantage is that Adjustment Layers are non-destructible and editable so you can tweak until you get the photo exactly the way you want.
The white eye-dropper tool for color cast is in the level adjustments in CS2.
__________________
~Colleen~
Re-attempting a creative life after far too long!
Reply With Quote
  #38  
Old 03-15-2011, 06:32 PM
Nettio's Avatar
Nettio Nettio is offline
Jabber-Jawbreaker
 
profile gallery send pm
Join Date: Feb 2007
Location: Texas
Posts: 7,196
Default

Quote:
Originally Posted by ColleenSwerb View Post
The white eye-dropper tool for color cast is in the level adjustments in CS2.
Yep, there's also one in the Curves adjustment panel. In CS3 there are also Auto buttons in both Levels and Curves that will run the auto adjustments but I can't remember if they were there in CS2 or not.

Just to give an idea, here's a super quick edit using only one Curves Adjustment layer, no levels or Camera Raw needed. I just fixed the white balance using the white point eyedropper and then adjusted the curve a little to avoid any blown highlights. You could then use another curves layer to make it pop a little bit more (I didn't for this example).

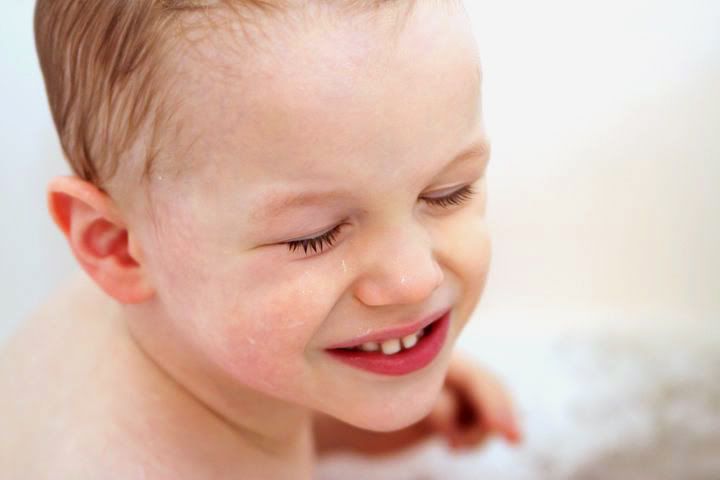
Last edited by Nettio; 03-15-2011 at 06:34 PM.
Reply With Quote
  #39  
Old 03-15-2011, 06:37 PM
nun69's Avatar
nun69 nun69 is offline
Sweetsaholic
 
profile gallery send pm
Join Date: Jan 2008
Location: Roanoke, VA
Posts: 10,044
Send a message via Yahoo to nun69
Default

you gus are da bomb...I put my camera on Manual today and played a little bit....pretty amazed at just a few of the shots I got I can see what I will be doing the next couple of weeks before school starts and I am getting my new backdrop stand and 3 seamless papers this week
Reply With Quote
  #40  
Old 03-15-2011, 06:59 PM
hmlentz's Avatar
hmlentz hmlentz is offline
Sugar Pie
 
profile gallery send pm
Join Date: Jun 2009
Location: MO
Posts: 200
Send a message via Yahoo to hmlentz
Default

I'd check your WB and if that's not it, just cool it off. I use PW's to Warm or Cool ALL the time. It works GREAT.
__________________
Reply With Quote
  #41  
Old 03-15-2011, 09:59 PM
AmyM's Avatar
AmyM AmyM is offline
Sweet Talker
 
profile gallery send pm
Join Date: Oct 2007
Location: NC
Posts: 1,938
Send a message via Yahoo to AmyM
Default

$5.50 and will save you hours of editing time. Unless you're a space cadet like me and forget to use it. Even if you don't set the custom WB in your camera, just take a picture of this (with not much else in the frame) before your shots. Take another one when lighting conditions change. Then you can use your dropper tool in LR and copy and paste the WB throughout. Probably can find a way to do that in other programs too.
http://www.bhphotovideo.com/c/produc...rd_8x10_1.html
__________________


facebook
Reply With Quote
  #42  
Old 03-15-2011, 10:19 PM
Shawna's Avatar
Shawna Shawna is offline
Sweet Talker
 
profile gallery send pm
Join Date: Feb 2007
Location: Wichita, Kansas
Posts: 3,067
Default

Saw these links posted over on CM today, you can't beat a completely free gray card right lol?? (just ordered my free samples today)
http://www.iheartfaces.com/2009/10/u...r-photography/
http://samples.wilsonartcontract.com...ea-d90-60.aspx
__________________
Reply With Quote
  #43  
Old 03-16-2011, 12:01 AM
Jen22's Avatar
Jen22 Jen22 is offline
Sweet Talker
 
profile gallery send pm
Join Date: Jan 2009
Location: Finally Back Home! The 'Coove, WA :D
Posts: 1,011
Default

Quote:
Originally Posted by Shawna View Post
Saw these links posted over on CM today, you can't beat a completely free gray card right lol?? (just ordered my free samples today)
http://www.iheartfaces.com/2009/10/u...r-photography/
http://samples.wilsonartcontract.com...ea-d90-60.aspx
Oh thank you so much! I just ordered mine - and even the S&H was free! Can't beat that!
Reply With Quote
  #44  
Old 03-16-2011, 12:24 AM
nun69's Avatar
nun69 nun69 is offline
Sweetsaholic
 
profile gallery send pm
Join Date: Jan 2008
Location: Roanoke, VA
Posts: 10,044
Send a message via Yahoo to nun69
Default

I ordered a free one too
Reply With Quote
  #45  
Old 03-16-2011, 08:59 AM
ayaandjudah's Avatar
ayaandjudah ayaandjudah is offline
Sweet Talker
 
profile gallery send pm
Join Date: May 2008
Posts: 1,724
Default

Can I ask a question? I only have Photoshop CS4, not the entire Adobe CS4, am I able to shoot in the RAW?

I'm not ready to do that today, lol, I'll need to reread that thread a few times but I'm curious if I can.....do I have camera raw in just the Photoshop CS4?
__________________
Reply With Quote
  #46  
Old 03-16-2011, 09:19 AM
sprauncey1's Avatar
sprauncey1 sprauncey1 is offline
Sweet Talker
 
profile gallery send pm
Join Date: Nov 2008
Location: Bordertown in Texas
Posts: 1,779
Default

Quote:
Originally Posted by ayaandjudah View Post
Can I ask a question? I only have Photoshop CS4, not the entire Adobe CS4, am I able to shoot in the RAW?

I'm not ready to do that today, lol, I'll need to reread that thread a few times but I'm curious if I can.....do I have camera raw in just the Photoshop CS4?
Yes, you can. CS4 comes with Adobe Camera Raw built in as well as the Bridge organizer program. They are just extentions of CS4 that don't have to run all the time.
Reply With Quote
  #47  
Old 03-16-2011, 09:25 AM
glumirk's Avatar
glumirk glumirk is offline
Sweet Talker
 
profile gallery send pm
Join Date: Jul 2008
Location: New Hampshire
Posts: 1,091
Default

You most definitely should. Try taking a picture in RAW and dragging it onto your Photoshop window. Prepare to be amazed!
__________________
Reply With Quote
  #48  
Old 03-16-2011, 09:26 AM
ayaandjudah's Avatar
ayaandjudah ayaandjudah is offline
Sweet Talker
 
profile gallery send pm
Join Date: May 2008
Posts: 1,724
Default

OK thanks. I am VERY dumb when it comes to camera talk, I feel like I need a step by step.

I don't even know how to shoot in the raw....but I'd like to try. Or at least do the quick fix JPG raw fix. My WB is off no matter what I do.
__________________
Reply With Quote
  #49  
Old 03-16-2011, 09:27 AM
ayaandjudah's Avatar
ayaandjudah ayaandjudah is offline
Sweet Talker
 
profile gallery send pm
Join Date: May 2008
Posts: 1,724
Default

Quote:
Originally Posted by glumirk View Post
You most definitely should. Try taking a picture in RAW and dragging it onto your Photoshop window. Prepare to be amazed!
are you saying to simply drag it from the windows explorer into PS and it will do it on it's own? Or do I have to do things?

I wish I knew this stuff, lol.
__________________
Reply With Quote
  #50  
Old 03-16-2011, 09:34 AM
kendallt's Avatar
kendallt kendallt is offline
Jabber-Jawbreaker
 
profile gallery send pm
Join Date: Dec 2009
Location: South Carolina
Posts: 5,677
Default

I'm loving all the great advice in this thread! Not to hijack, but...is there any advantage to using a light scoop like this with indoor shots?

I'm saving up for the Speedlite of my dreams, but until then, I was wondering if this might help.
__________________
Reply With Quote
Reply


Posting Rules
You may not post new threads
You may not post replies
You may not post attachments
You may not edit your posts

BB code is On
Smilies are On
[IMG] code is On
HTML code is Off

Forum Jump


All times are GMT -4. The time now is 03:53 PM.


Powered by vBulletin® Version 3.8.7
Copyright ©2000 - 2024, vBulletin Solutions, Inc.
All Creative Content © 2007 SweetShoppeDesigns

Making your memories sweeter

Copyright © 2016 Sweet Shoppe Designs – The Sweetest Digital Scrapbooking Site on the Web | Site by Lilac Creative