Sweet Shoppe Designs


Go Back   Sweet Shoppe Community > Candy Coated Conversation > A Sweet Little Community
Register FAQ Community Calendar Today's Posts Search

Reply
 
Thread Tools Display Modes
  #1  
Old 09-12-2013, 01:10 PM
tanyiadeskins's Avatar
tanyiadeskins tanyiadeskins is offline
Sweet Talker
 
profile gallery send pm
Join Date: Dec 2008
Location: Orlando, Florida
Posts: 3,175
Default Technique help needed

I am working with one of the block party templates here:


It is the top right one. One of the things that drew my eye is the Title here sideways how can I make a title like that? Its not just a stroke because the white and the blue parts are separate with shadowing on each. I used to know how to expand or something around letters to fill or something...gah I dont know, if that makes any sense is there a tut on the blog from the babes or does anyone know how?

thank you!
Reply With Quote
  #2  
Old 09-12-2013, 01:18 PM
dana's Avatar
dana dana is offline
Sweet Talker
 
profile gallery send pm
Join Date: Oct 2007
Posts: 2,321
Default

maybe you are thinking about "select -> modify -> expand" ?
__________________


creating for:
the lilypad / sahlin studio
Reply With Quote
  #3  
Old 09-12-2013, 01:25 PM
tanyiadeskins's Avatar
tanyiadeskins tanyiadeskins is offline
Sweet Talker
 
profile gallery send pm
Join Date: Dec 2008
Location: Orlando, Florida
Posts: 3,175
Default

gah! maybe thats it, ty I will try!
Reply With Quote
  #4  
Old 09-12-2013, 01:31 PM
KateD's Avatar
KateD KateD is offline
Sweet Talker
 
profile gallery send pm
Join Date: Jun 2010
Location: Belgium
Posts: 2,125
Default

If I'm going for that effect, I usually make the title and duplicate it. I'll put a stroke on the bottom layer and then rasterize the layer or convert it to a smart object before shadowing it. Depending upon the font, it might be better to make the bottom layer first, duplicate it, then contract the top layer. Sometimes putting on an outer stroke or expanding something will leave you with rounded edges.
Reply With Quote
  #5  
Old 09-12-2013, 01:33 PM
Rubia Padilha's Avatar
Rubia Padilha Rubia Padilha is offline
Sweet Shoppe Designer
 
profile gallery send pm
Join Date: Feb 2010
Location: Brazil
Posts: 12,957
Default

with PS is that what Dana said...
OR you can always write the word once, and write letter by letter and resize letter by letter, but the first way it's easier.
__________________
Reply With Quote
  #6  
Old 09-12-2013, 01:39 PM
tanyiadeskins's Avatar
tanyiadeskins tanyiadeskins is offline
Sweet Talker
 
profile gallery send pm
Join Date: Dec 2008
Location: Orlando, Florida
Posts: 3,175
Default

Quote:
Originally Posted by Rubia Padilha View Post
with PS is that what Dana said...
OR you can always write the word once, and write letter by letter and resize letter by letter, but the first way it's easier.
I think I am actually going to have to do each letter seperately as other wise they end up touching and running in to each other.
Reply With Quote
  #7  
Old 09-12-2013, 02:02 PM
breakingbrie's Avatar
breakingbrie breakingbrie is offline
Sweet Talker
 
profile gallery send pm
Join Date: Apr 2008
Location: FLW, Missouri
Posts: 3,669
Default

I'm not sure what you're using, but I'm using ps... If you're using text and you want your letters spaced out more, so that they're not touching when you expand or add a stroke -

I use this little box, and it spreads out the text. I don't know what it's called lol. Where the arrow is pointing, and it says 200? That's the bottom line of text. The next one up is 100, the next up is 50, and the next up is 0. That can space your text if you need it.
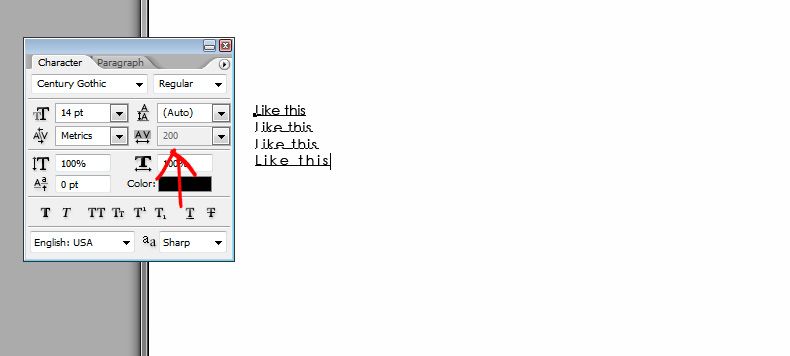


Hope that makes sense? Not sure if it helps for what you're doing or not.
__________________
Reply With Quote
  #8  
Old 09-12-2013, 02:11 PM
Rubia Padilha's Avatar
Rubia Padilha Rubia Padilha is offline
Sweet Shoppe Designer
 
profile gallery send pm
Join Date: Feb 2010
Location: Brazil
Posts: 12,957
Default

hope that works, beautiful! <3
__________________
Reply With Quote
  #9  
Old 09-12-2013, 02:27 PM
tanyiadeskins's Avatar
tanyiadeskins tanyiadeskins is offline
Sweet Talker
 
profile gallery send pm
Join Date: Dec 2008
Location: Orlando, Florida
Posts: 3,175
Default

yeppers and ty I think I should be able to do this now lol I think I forget way more than I ever learn hehe
Reply With Quote
  #10  
Old 09-12-2013, 02:53 PM
thompsonc2007's Avatar
thompsonc2007 thompsonc2007 is offline
Sweets
 
profile gallery send pm
Join Date: Dec 2010
Posts: 250
Default

You can also

Control/Command Click the text layer (to get the marching ants around the text)
Create a new layer and select it in the Layers pane
Click Select, Modify Selection, Expand
Enter the amount you want to expand (don't worry if it is not big enough the first time you can always repeat process to make it even larger)
Press Enter
Now Click Edit, Fill Selection (Make sure Preserve Transparency is unchecked)
Now move this new layer behind the text layer
You can clip papers and add shadowing too

I hope this helps
__________________

Reply With Quote
  #11  
Old 09-12-2013, 02:55 PM
eranslow's Avatar
eranslow eranslow is offline
Sweet Talker
 
profile gallery send pm
Join Date: Aug 2009
Posts: 3,940
Default

The way I would do it is add a stroke, create a layer with the stroke. And then you can clip papers to the layers and give them their own shadows. Oh - this is all done after rasterizing the text.
__________________



Reply With Quote
  #12  
Old 09-12-2013, 03:05 PM
tanyiadeskins's Avatar
tanyiadeskins tanyiadeskins is offline
Sweet Talker
 
profile gallery send pm
Join Date: Dec 2008
Location: Orlando, Florida
Posts: 3,175
Default

thank you ladies so much! I am working on the LO and I will see what works out best for title! At least now I know I can do what I had in mind
Reply With Quote
  #13  
Old 09-13-2013, 12:27 PM
TheHybridMess's Avatar
TheHybridMess TheHybridMess is offline
Sugar Cookie
 
profile gallery send pm
Join Date: Jul 2011
Location: Johannesburg, South Africa
Posts: 334
Default

I actually do the opposite of what Kate does and Inside Stroke the top layer and then delete it. That way I know the spacing correct.
__________________
new siggie coming soon
Reply With Quote
  #14  
Old 09-13-2013, 12:48 PM
Nettio's Avatar
Nettio Nettio is offline
Jabber-Jawbreaker
 
profile gallery send pm
Join Date: Feb 2007
Location: Texas
Posts: 7,196
Default

Quote:
Originally Posted by thompsonc2007 View Post
You can also

Control/Command Click the text layer (to get the marching ants around the text)
Create a new layer and select it in the Layers pane
Click Select, Modify Selection, Expand
Enter the amount you want to expand (don't worry if it is not big enough the first time you can always repeat process to make it even larger)
Press Enter
Now Click Edit, Fill Selection (Make sure Preserve Transparency is unchecked)
Now move this new layer behind the text layer
You can clip papers and add shadowing too

I hope this helps
This is what I did to make the title in the template. Then I just shadowed both layers so it looked like they were cut out from paper. I've done the Stroke option as well.
Reply With Quote
  #15  
Old 09-13-2013, 01:08 PM
carrie1977's Avatar
carrie1977 carrie1977 is offline
SugarBabe
 
profile gallery send pm
Join Date: Aug 2009
Location: Central California
Posts: 9,872
Default

This is going to come in handy....thanks!!
__________________


Reply With Quote
Reply


Posting Rules
You may not post new threads
You may not post replies
You may not post attachments
You may not edit your posts

BB code is On
Smilies are On
[IMG] code is On
HTML code is Off

Forum Jump


All times are GMT -4. The time now is 02:26 PM.


Powered by vBulletin® Version 3.8.7
Copyright ©2000 - 2024, vBulletin Solutions, Inc.
All Creative Content © 2007 SweetShoppeDesigns

Making your memories sweeter

Copyright © 2016 Sweet Shoppe Designs – The Sweetest Digital Scrapbooking Site on the Web | Site by Lilac Creative